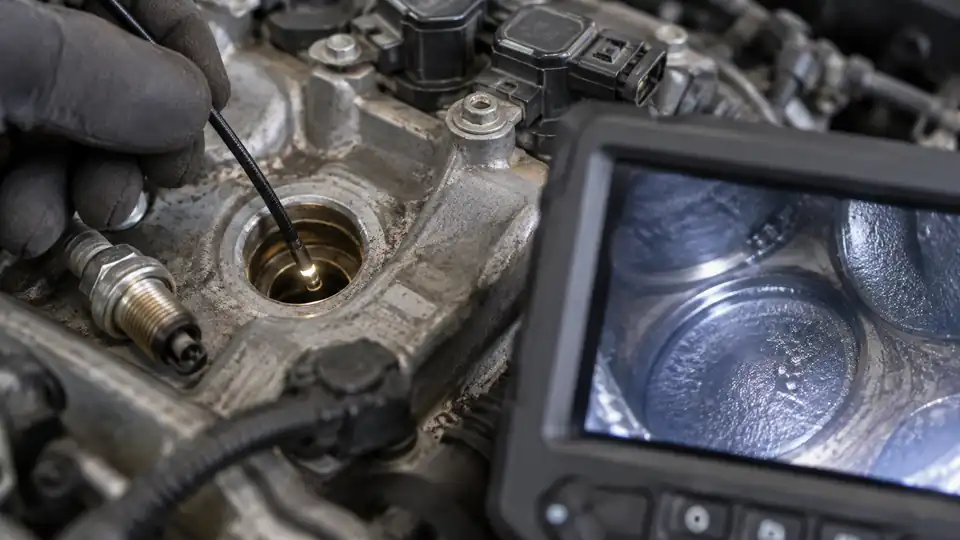
Using a borescope through a spark plug hole lets you inspect the combustion chamber without removing the cylinder head. The useful view comes from controlled movement, a clean access point, and enough patience to keep the camera lens close to the area you want to examine. A rushed probe can smear oil across the lens or snag on the plug threads, so the procedure starts before the camera enters the engine.
Prepare the Engine and Borescope
Park the vehicle on a stable surface, switch the engine off, and allow hot components to cool to a temperature suitable for the inspection camera. Prevent accidental starting by following the vehicle manufacturer’s service procedure for disabling ignition or fuel delivery. The exact method varies by engine, so use the service information for that vehicle rather than relying on a universal wire or fuse.
Gather the borescope, the correct spark plug socket, a ratchet, a small light for the plug well, and a clean cloth. Check the camera head against the spark plug opening before inserting it. A probe that fits through the hole still needs enough room to pass the threads without scraping, and a thicker camera head can have difficulty reaching the cylinder even when the flexible cable itself appears narrow.
Inspect the probe tip and lens. A fingerprint, oily film, or fine shop dust can turn a sharp piston view into a gray blur. Wipe the lens according to the camera manufacturer’s instructions, then check that the display, recording function, and probe controls respond before removing the spark plug.
Remove the Spark Plug Without Dropping Debris
Clean the area around the spark plug before loosening it. Dirt often collects in the recessed plug well, and a small grain can fall into the cylinder after the plug is removed. A soft brush and suitable cleaning method can clear the surrounding area. Keep loose debris away from the opening, and avoid blasting contamination deeper into the engine.
- Remove any ignition coil, plug wire, cover, or connector that blocks access.
- Use the correct spark plug socket and loosen the plug carefully.
- Lift the spark plug out without dragging dirt across the opening.
- Look at the plug and its tip for heavy deposits, wet residue, damaged electrodes, or unusual wear.
- Place the plug somewhere clean so it can be reinstalled in its original cylinder if appropriate.
The spark plug can provide useful context for what appears inside the chamber, but its condition alone does not prove the cause of an engine problem. A dark deposit, wet-looking material, or damaged electrode may justify further checks, while the borescope supplies a closer view of the cylinder and piston surface.
Insert the Camera Through the Spark Plug Hole
Start with the camera head just above the opening. Turn on the display and lower the probe slowly, keeping the cable aligned with the hole. Avoid twisting the cable sharply against the plug threads, and never push harder when the tip meets resistance. Stop, withdraw slightly, change the angle, and reassess the path.
The first image may show the upper part of the combustion chamber, a valve edge, or the piston crown, depending on the engine design and piston position. Keep the probe steady for a moment before moving it farther. A moving camera produces soft, shaky images, while a short pause lets the display settle and makes small surface features easier to judge.
Stay close enough for useful detail without pressing the lens against the piston or cylinder wall. Contact can scratch the lens window, spread residue across it, or leave the camera trapped against a surface. If the image suddenly becomes cloudy, withdraw a little and check whether the lens has touched oil, carbon, or condensation.
Use the Camera Controls Deliberately
Move the cable in small increments and use articulation gradually if the probe has active directional control. A flexible cable bends, but it does not automatically steer the camera head. A semi-rigid probe can hold a curve, while an articulating probe uses a control to redirect the tip. Probe rotation changes the camera’s orientation, but it is different from active articulation.
Begin with moderate lighting. Shiny piston surfaces and wet-looking areas can reflect bright LEDs directly into the lens, creating a white glare patch that hides detail. Lowering the light, changing the viewing angle, or moving a few millimeters away may reveal more than increasing brightness. Digital zoom can enlarge the image on the display, but it cannot recover physical detail the camera never captured.
A useful sequence often starts with a wide view, followed by slower close views of the piston crown, cylinder wall, and any area that looks unusual. Save a clear image only after the probe is steady and the target is in focus. A blurry close-up can be less useful than a slightly wider image with recognizable engine context.
How to View the Piston and Cylinder Wall
For a piston-crown inspection, look for the broad surface below the spark plug opening. The piston may sit near the top or bottom of its travel, so the visible area can change significantly from one inspection to another. A clean, centered view helps show general surface condition, while an angled view can reveal raised marks, edge damage, or uneven deposits.
To reposition the piston, some engines can be turned by hand at the crankshaft with the correct socket and access procedure. Keep the borescope clear of moving parts, never use the starter with the probe inside the cylinder, and rotate the engine slowly. If the crankshaft does not move normally, stop rather than applying excessive force.
The cylinder wall usually appears at the edge of the piston view. Redirect the camera toward the wall and make a slow sweep rather than dragging the tip around the bore. Look for visible scoring, discoloration, wet-looking streaks, or areas that appear different from the surrounding surface. A mark may be a reflection, deposit, machining feature, or damage, so the image should guide further inspection rather than serve as a complete diagnosis.
| Visible observation | What it may suggest | What the image cannot establish alone |
|---|---|---|
| Uneven or heavy deposits on the piston crown | A combustion or oil-control issue may deserve additional investigation | The exact source, age, or severity of the deposits |
| Wet-looking residue | Fluid may be present in the chamber | Whether the material is fuel, oil, coolant, or another substance |
| Scuff-like or crack-like line | The area may need a closer inspection and mechanical testing | Whether it is a true crack, how deep it is, or whether the component is safe |
| Different appearance from another cylinder | The cylinders may warrant comparison through compression, leak-down, or other tests | The underlying cause of the difference |
Comparing cylinders can make subtle differences easier to spot. Keep the camera distance, lighting, and viewing angle reasonably similar for each hole. A piston viewed straight on under a bright reflection can look dramatically different from one viewed at an angle, so matching the inspection conditions prevents false comparisons.
What to Look For During the Inspection
Scan the piston crown for unusual deposits, damaged-looking edges, deep marks, or foreign material. Then check the visible portions of the cylinder wall and the areas near the valve edges. A borescope may show a useful clue, such as a wet-looking patch or an unusually clean section, but a clue is not a confirmed failure diagnosis.
Pay attention to image quality as you work. If every surface looks washed out, reduce the light or change the angle. If the entire view remains hazy, withdraw the probe and inspect the lens. If only one spot is blurry, the camera may be too close, the surface may be reflecting light, or the lens may be touching residue.
Valve visibility depends heavily on piston position, camera angle, spark plug location, and probe control. A straight probe may show only a small portion of a valve, while an articulating probe can redirect the camera toward the valve area. A side-view or dual-lens camera can present a different viewing direction, but neither feature automatically provides the same control as articulation.
Withdraw the Probe and Reinstall the Spark Plug
Retract the probe slowly while watching the display. Keep the tip centered as it approaches the threads, and avoid scraping the camera head against the metal opening. Once the probe is out, inspect the lens again for residue or damage.
Reinstall the spark plug using the vehicle manufacturer’s specification for thread condition, torque, and any required gap or replacement procedure. Refit the coil, wire, connector, or cover, then confirm that nothing remains near the plug well. If the inspection revealed a suspicious surface but the engine still operates normally, arrange the next diagnostic step rather than treating the camera image as a final verdict.
A borescope inspection is most useful when it answers a focused question: is there visible damage, unusual residue, or a meaningful difference between cylinders? Keep the probe clean, move it gently, compare similar views, and stop whenever the path becomes uncertain. That approach produces a clearer inspection and protects both the camera and the engine.
